Building an Atmospheric Station with a Raspberry Pi Zero W
A weekend project that turned into a week: sensors, MQTT, a custom
dashboard, and a mountain of UART debugging.
Disclosure — this post contains affiliate links to Seeedstudio. If you buy through them I get a small commission at no extra cost to you. Everything I recommend is something I actually used (or considered using) for this build.
I have a small balcony in Barcelona that catches the afternoon sun and the Mediterranean breeze in roughly equal measure. I wanted a wall display that would tell me - at a glance, from the kitchen - what the air felt like outside, what was coming in the next 24 hours, and whether it was a good idea to open the windows.
What I ended up building is a Raspberry Pi Zero W with a Pimoroni Enviro+ sensor board and a PMS5003 particulate-matter module, publishing readings hourly over MQTT to a Mosquitto broker, where a second Pi with a 7-inch touchscreen subscribes via WebSockets and renders a custom dashboard with a 24-hour forecast pulled from Open-Meteo.
The whole thing cost about €90 in parts and took roughly a week of evenings, most of which was spent fighting the UART. This is the post I wish I had read before starting.
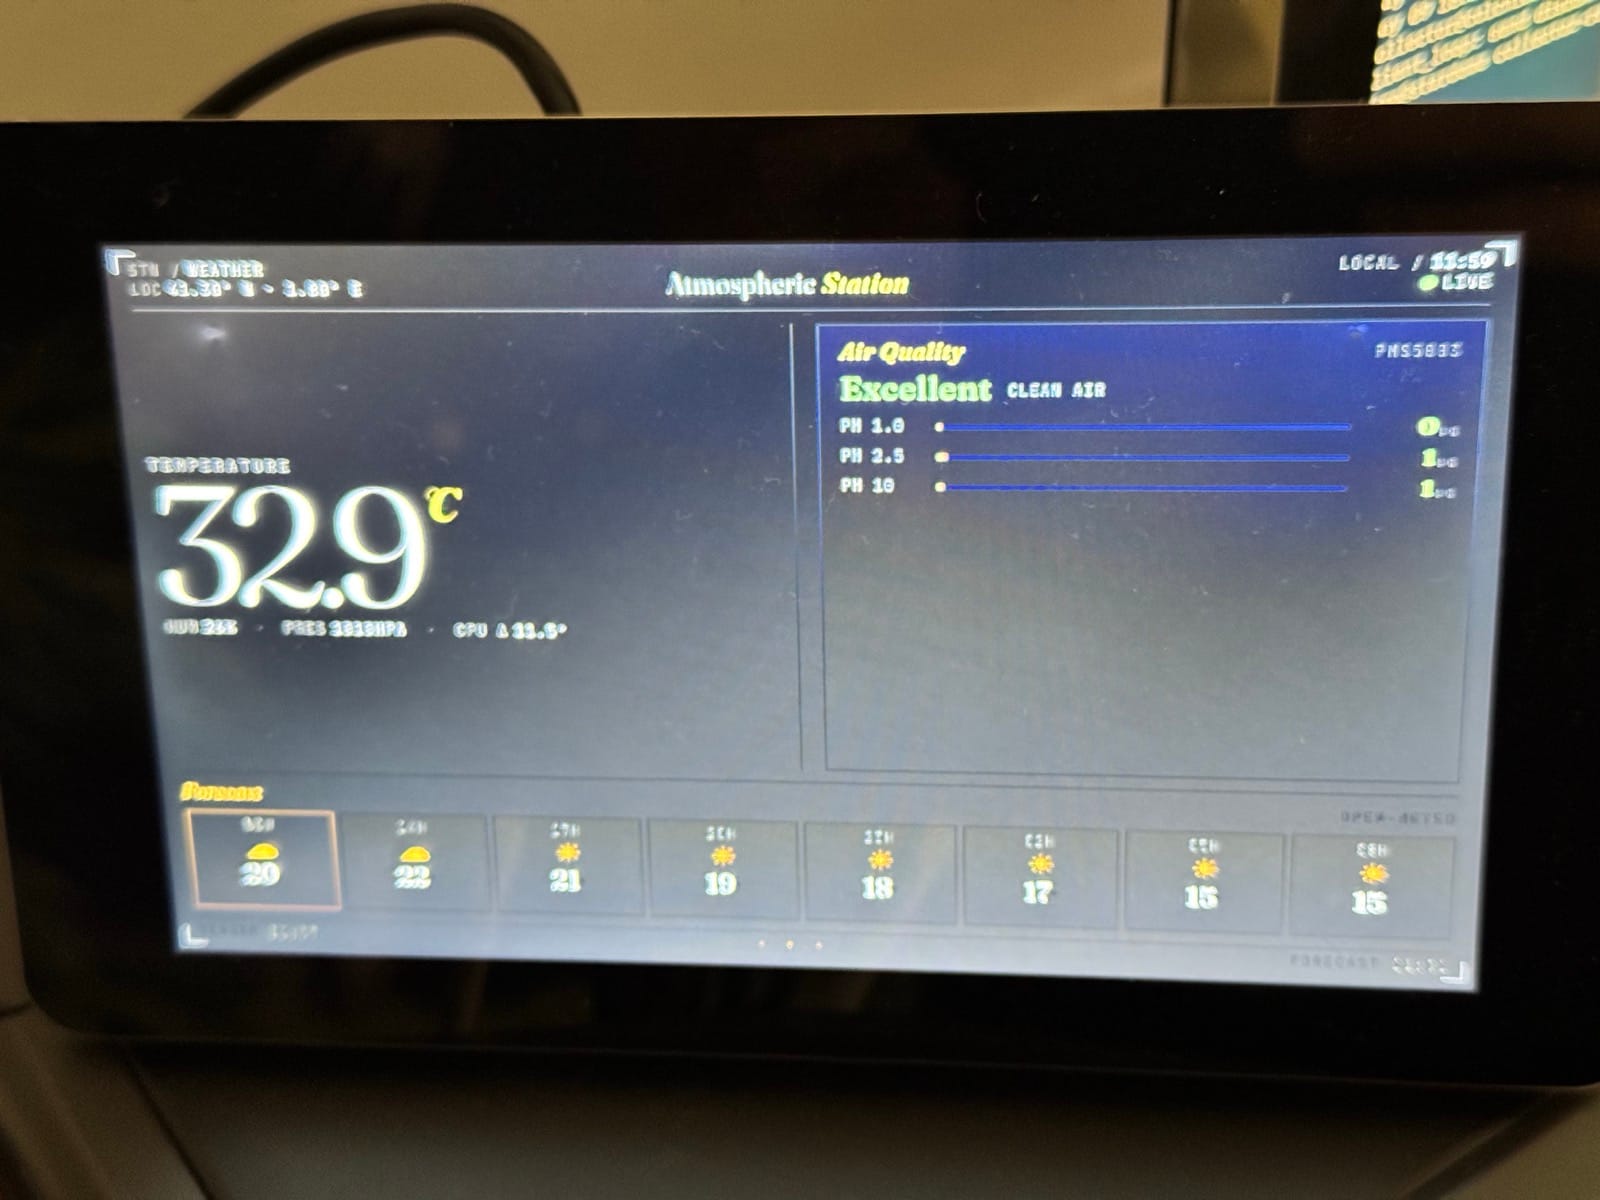
Live readout from the balcony sensor at midday. The 32.9 °C is the enclosure heat-soaking in direct Mediterranean sun, not actual air temperature — a vivid argument for why the Stevenson screen on the to-do list isn't optional.
What it does
Once an hour, the sensor Pi wakes the particulate sensor's fan, lets it run for thirty seconds, takes five samples, averages them, sends a JSON payload to MQTT, and puts the laser back to sleep to preserve its lifespan. The dashboard subscribes to that topic and updates whatever's on screen the moment a new message arrives. It also fetches a 24-hour forecast for Barcelona from a free weather API every half hour.
The dashboard is one HTML file, deliberately. No build step, no framework, no database. Open it in a browser and it just works.
The hardware
The brain is a Raspberry Pi Zero W — small, cheap, low-power, has built-in Wi-Fi, perfect for a sensor that just needs to publish a tiny JSON blob once an hour. I chose the Zero W specifically because the entire setup runs on a 5V/2.5A power supply and idles quietly in a corner. (The link goes to the Pi Zero 2 W, which is what's stocked these days — same pinout, same form factor, but quad-core and a lot more headroom. If you're starting fresh, get that one. My original Zero W was just what I had on the shelf.)
For sensors, I used the Pimoroni Enviro+ — temperature, humidity, pressure (BME280), light and proximity (LTR559), gas (MICS6814), and a header for an optional particulate sensor. To that I added a Plantower PMS5003 for PM1, PM2.5, and PM10 readings. The PMS5003 is the same sensor used in Purple Air monitors and is the de-facto cheap-but-decent choice for outdoor PM measurement.
For the display, the official Raspberry Pi 7-inch Touchscreen. 800×480 IPS with capacitive multi-touch, driven over DSI from a separate Pi 4 I had lying around — though for a new build the Raspberry Pi CM5 Development Kit is what I'd reach for now, since it brings substantially more power than a Pi 4 in the same footprint and gives you a tidy I/O board with everything (including DSI) pre-broken out. The DSI ribbon keeps the wiring much cleaner than HDMI, and the touchscreen's included mounting holes make a clean stand-up build easy. Crucially for me: 800×480 is small enough that you can't lean on browser scrolling — it forces the dashboard to actually fit the panel, which is good for a wall display that you want to read at a glance. The Zero W focuses on sensors and nothing else; the indoor Pi runs the broker, hosts the dashboard, and drives the screen.
You'll also want a microSD card, a power supply, and ideally a small enclosure — though for the outdoor box I'm still working on a 3D-printed Stevenson screen so the temperature reading isn't being polluted by direct sun. More on that later.
The architecture, in one sentence
Pi Zero W (sensor) → Mosquitto (broker) → Pi 4 (browser display), with the broker running on the same machine as the dashboard Pi to keep the network surface small. Everything is on the home Wi-Fi.
The reason it's MQTT and not, say, the dashboard polling an HTTP endpoint on the sensor is that I wanted the sensor Pi to be effectively dormant 99% of the time. It runs a Python script under cron once an hour, publishes, and sleeps. The broker holds the most recent message with retain=true, so when the dashboard connects (or reconnects after a power blip) it gets the last reading immediately rather than waiting up to an hour for the next one.
The Python sensor script
The script is straightforward but has a few non-obvious touches:
- CPU heat compensation — the Pi's SoC sits about a centimeter from the BME280, and CPU heat conducts straight through the PCB. Without compensation, indoor temperature reads about 5-8 °C high. I subtract a fraction of (CPU temp − raw temp) using a tunable factor; for an unenclosed Pi Zero W I landed on 2.25 indoors. Outdoors with airflow it'll need to be retuned.
- PMS5003 fan management — the laser inside the PM sensor is rated for around 8,000 hours of continuous operation. If you sample once an hour and leave it running, that's about a year of life. If you wake it, sample, and put it back to sleep, you're at well under 5% duty cycle and it should last for years. The library has
cmd_wake()andcmd_sleep()for exactly this. - Per-sensor error handling — if one sensor fails (or is disconnected), the script catches the exception, adds an
errorfield to the payload, and publishes everything else. The dashboard never goes blank because of one flaky sensor.
The published JSON looks like this:
{
  "ts": "2026-05-09T14:14:05.124369+00:00",
  "host": "weather",
  "temperature_c": 23.64,
  "temperature_raw_c": 29.08,
  "cpu_temperature_c": 41.32,
  "pressure_hpa": 1007.35,
  "humidity_pct": 67.91,
  "pm1_ugm3": 5.6,
  "pm2_5_ugm3": 8.2,
  "pm10_ugm3": 8.2,
  "gas_oxidising_kohm": 184.63,
  "gas_reducing_kohm": 18.85,
  "gas_nh3_kohm": 17.07
}
I keep both the compensated and the raw temperature in the payload, plus the CPU temperature. That way if I ever want to tune the compensation factor against historical data, I haven't lost the inputs.
The bit nobody warns you about: UART
This is where I lost three evenings.
The PMS5003 is a serial device. It talks at 9600 baud over UART. On a Pi Zero W, there are two UARTs: a real hardware one called /dev/ttyAMA0, and a "mini-UART" called /dev/ttyS0. By default, Bluetooth grabs the real UART, and the GPIO header is left with the mini-UART. The mini-UART is a junk implementation whose baud rate depends on the CPU core clock — which scales with load — meaning bytes get garbled the moment the Pi does anything.
So step one is freeing the proper UART. Add dtoverlay=disable-bt to /boot/firmware/config.txt, reboot, and /dev/serial0 should symlink to ttyAMA0 instead of ttyS0. (You'll lose Bluetooth on that Pi. For a sensor that just publishes MQTT, that's fine.)
Step two is making sure the kernel hasn't claimed the now-functional UART for itself as a serial console. Edit /boot/firmware/cmdline.txt and remove the console=serial0,115200 token. Important: that file is a single line. Do not introduce a newline.
After both fixes, reading the serial port directly gave me clean PMS5003 frames starting with the 0x42 0x4D magic bytes, and the Python library worked.
The dashboard
The dashboard is one HTML file with inline CSS and JS, a couple of Google Fonts, and the mqtt.js library loaded from a CDN. The browser connects to Mosquitto over WebSockets on port 9001 (Mosquitto needs a separate listener 9001 / protocol websockets block in its config — they can coexist with the regular TCP listener on 1883), subscribes to sensors/+/enviro, parses each JSON message, and updates the DOM.
The aesthetic I went for is "scientific instrument": deep near-black background, warm cream readouts (like an old phosphor display), one accent amber for headers and active elements, color grading on the air quality numbers based on WHO 2021 24-hour guidelines (green under 15 µg/m³ for PM2.5, amber up to 35, red above). Fraunces serif for the temperature and headers; JetBrains Mono for the data.
The layout has three sections: a hero temperature on the left, an air quality panel on the right with a graded headline (Excellent / Good / Moderate / Poor) and three bars for PM1, PM2.5, and PM10, and a forecast strip across the bottom showing the next 24 hours from Open-Meteo in 3-hour increments. The "now" cell has an amber border so it stands out.
The whole thing is about 600 lines including styles. The display Pi runs Chromium in kiosk mode pointed at the file, with unclutter to hide the cursor and screen blanking disabled in raspi-config.
What I learned
A few things stand out, beyond the UART saga:
Indoor temperature is a calibration problem, not a measurement problem. The BME280 is accurate to about ±0.5 °C in a vacuum. Mounted on a PCB next to a hot SoC inside a plastic case in a sunlit room, that accuracy disappears the moment you turn the Pi on. Compensation gets you most of the way back, but you need a reference to set the factor.
The PMS5003 reports PM2.5 ≈ PM10 in clean indoor air, and that's correct, not broken. PM10 is cumulative — every PM2.5 particle is also a PM10 particle. The values diverge only when there's actual coarse dust around (sweeping, opening a window onto a dusty street, shaking out a blanket).
Retain flags are the difference between a dashboard that works and a dashboard that's blank for 59 minutes per hour. Setting retain=true on the publish means a freshly-connected subscriber gets the last value immediately. With hourly sampling, this is the difference between the display being useful and the display being decorative.
Open-Meteo is genuinely free and excellent. No API key, generous limits, decent CORS. For a personal-scale project it's the obvious pick. They support most of Europe at high resolution and the response shape is sensible.
What's next
A few things on the list:
- A 3D-printed Stevenson screen for the outdoor sensor box. Without one, the temperature reading is going to track the sun more than the air.

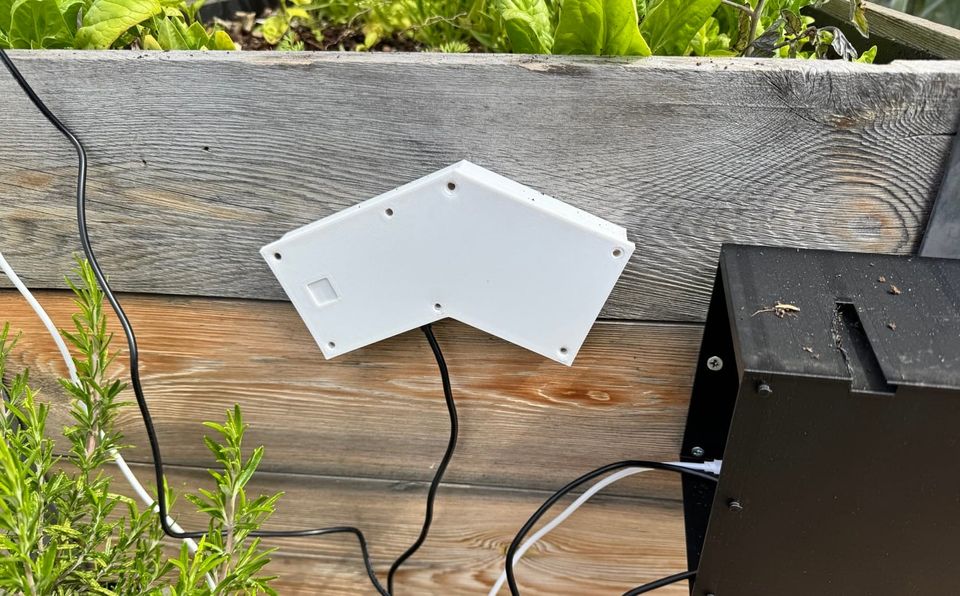
Current setup: the sensor enclosure (right) mounted next to a planter on the balcony, with the 3D-printed angled bracket clipping it to the wood rail. Functional but unshielded — hence the wildly optimistic temperature readings around solar noon.
- Going off-grid is in progress, and the architecture turned out to be simpler than I expected. A USB-C solar panel handles its own voltage regulation internally — it just outputs a normal USB-grade 5 V — so you can feed it straight into any charger/boost combo board without needing a separate solar charge controller. I'm running an Adafruit PowerBoost 1000 Charger with a LiPo on the JST and a small USB-C solar panel on the micro-USB input. That's the entire chain: panel, charger/boost board, battery, Pi. If you'd rather use a traditional 12 V panel like the Seeed 12 W with mounting bracket, you need a board that has its own solar input — the Seeed Lipo Rider Plus or older Lipo Rider Pro both fit that role, or the PowerBoost paired with a dedicated charge controller like the Adafruit bq24074. The single most important lesson I've learned debugging this: the LiPo capacity matters far more than the panel rating. A Pi Zero 2 W with Enviro+ and PMS5003 draws roughly 220 mA continuous from a 3.7 V cell, so you need at least 3500 mAh of usable capacity just to comfortably bridge a 12-hour night. A 1000 or 2000 mAh cell will leave the Pi dying somewhere between 22:00 and 03:00, no matter how much sun you got during the day. Size for the night first, then worry about the panel.
- Logging readings to InfluxDB (also via MQTT, with Telegraf as the bridge) so I can see trends over weeks.
- A small barometric trend indicator on the dashboard — pressure rising/steady/falling over the last few hours is a remarkably good ad-hoc forecast for the next few hours, independent of the Open-Meteo data.
- A second sensor node indoors. The dashboard already supports multiple hosts via the wildcard subscription; I just need another Pi.
The fun thing about a project like this is that nothing about it is really finished. Every weekend there's another small thing to add or tune. That's most of the appeal.
If you build something similar, the parts list above will get you 90% of the way there. The other 10% is your specific apartment, your specific Wi-Fi, your specific patience for fighting bootloader config files, and is sadly not something a blog post can help with.
Parts mentioned in this post — affiliate links where I have an account, plain links otherwise:
- Raspberry Pi Zero 2 W — Seeedstudio
- Pimoroni Enviro+ — Pimoroni shop
- Plantower PMS5003 — Pimoroni
- Seeed Lipo Rider Plus (planned, for solar power) — Seeedstudio
- Seeed Lipo Rider Pro (alternative) — Seeedstudio
- Adafruit PowerBoost 1000 Charger (alternative) — Adafruit
- Adafruit bq24074 Universal Solar/DC Charger (for use with PowerBoost) — Adafruit
- 12 W solar panel with mounting bracket (planned) — Seeedstudio
- Official Raspberry Pi 7-inch Touchscreen — Seeedstudio
- Raspberry Pi CM5 Development Kit (recommended display Pi for new builds) — Seeedstudio
Member discussion